 |
|
|
 |
|
|
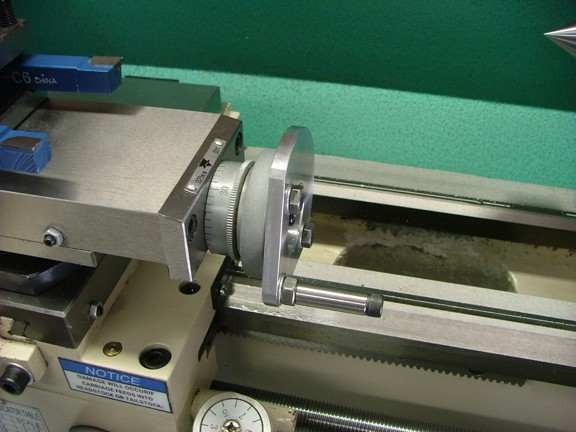
I cut some of the wheel off to act as a counterbalance for the handle (seen below). This will help prevent the wheel from inadvertently spinning should the lathe vibrate while cutting.
|
|
|
 |
|
|
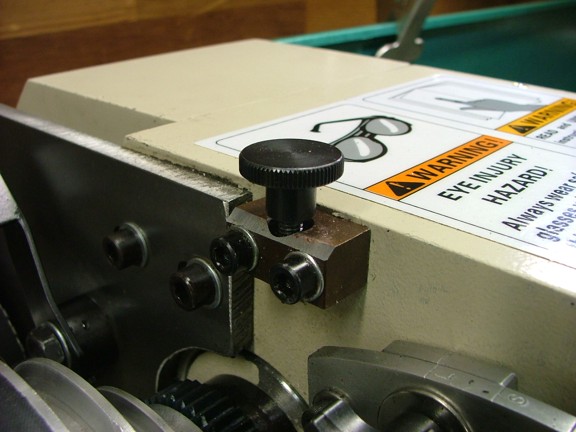
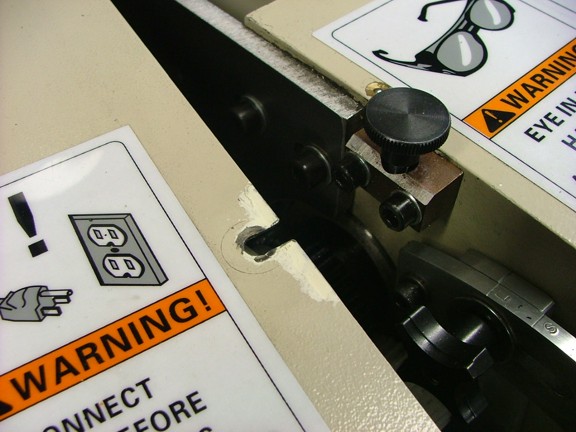
The last little modification that I made that might be worth mentioning is the belt change cover screw. The stock cover screw had to be removed to open the belt cover so I used an idea that I saw in the Atwood article that works very well. I bought an M6 x 1mm pitch thumb screw to replace the stock one (McMaster-Carr Cat# 92581A450) and slotted the cover to allow it to be opened without removing the screw.
|
|
|
 |
|
|
I also beveled the leading edge of the screw block to make it easier to close the door. This setup makes opening the belt cover much easier ;0) Thanks again Dennis!!!
|
|
|
 |
|
|
Added on February 29, 2012:
It has now been several weeks since I first received my new Grizzly G0602 lathe at the shop. Since then I have had plenty of time to get familiar with the machine. I have practiced turning different metals and I am really surprised at how well the lathe performs. The G0602 has plenty of power and there is not much that I am left wanting.
However there is one other feature that my older 7 x 10 lathe has that my new 10 x 22 lathe does not and that is a variable speed drive motor. I have become so accustomed to running my 7 x 10 lathe with a variable speed drive that the new lathes belt change system seems so inefficient. Not only does it take more time to set up a cut it is somewhat unsafe to spin up larger parts to full cutting speed all at once.
A variable speed drive has the great advantage of being able to slowly ramp up the spindle speed before cutting. Not only can you check the balance of unusually shaped parts you can verify that the tool bit is cutting correctly before ramping up to full cutting speed. A variable speed drive can also help reduce chatter caused by harmonics which can only be corrected “on the fly” by adjusting the cutting speed to find a “sweet spot”.
I have enjoyed all of these advantages with my 7 x 10 lathe and now I want the same for my new machine. This means that I must upgrade the drive system in the G0602. Luckily I found an article written by a Henry Arnold that outlines the process so I used it as a basis for my conversion.
Update 12/23/13: Since the publishing of this article Grizzly Industrial has introduced a G0602 type lathe that has a variable speed drive and tachometer built into the unit called the G0752. It looks a lot like this conversion so I guess they do pay attention to what the customer wants ;0)
|
|
|
 |
|
|
The only way to upgrade my new lathe to a variable speed drive is to replace the existing 1-HP capacitor start motor with a new three-phase induction motor (seen above). This new “asynchronous” motor can then be driven with a Variable Frequency Drive (VFD) which can alter the speed of the motor by changing the frequency of the power supplied to the motor. Not only can the VFD alter the frequency of the incoming power it can produce a three-phase output from a single-phase input (much like a portable AC power inverter).
Luckily the Henry Arnold article refers to a direct replacement motor for the old capacitor start motor. This Leeson 1-HP three-phase 230V induction motor (Cat# 192051.00) was purchased from Electric Motor Wholesale for about $165. This motor is a “drop in” replacement that requires no modification to install (seen installed on the lathe below).
|
|
|
 |
|
|
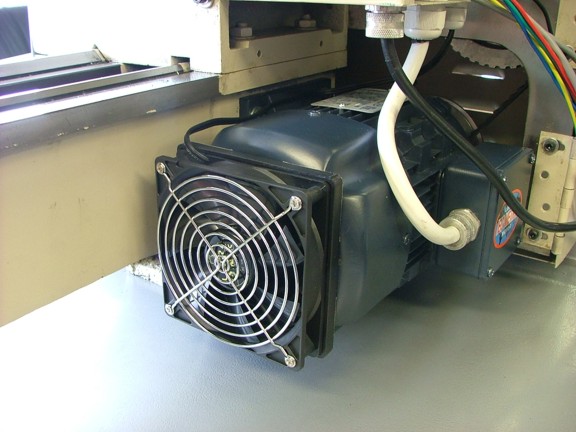
After installing the motor I added a cooling fan to the back of the motor to supplement cooling at low RPM (seen below). This fan is a 120mm computer case fan fed with a 200mA 12V DC power supply that is housed in the existing control box on the back of the headstock (not shown).
|
|
|
 |
|
|
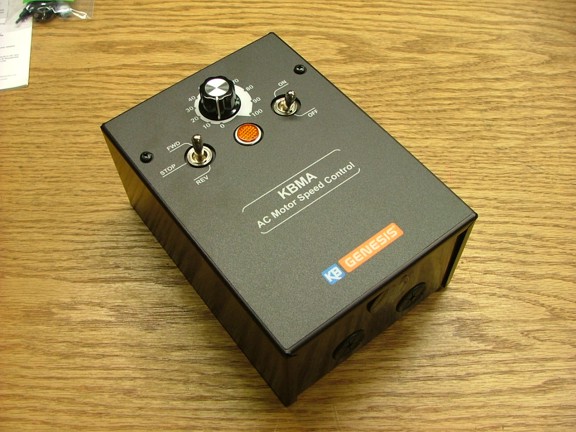
To drive the new three-phase motor I purchased a VFD drive from Electric Motor Wholesale for about $208. This unit is made by KB Electronics (Cat# KBMA-24D-FSR) and is capable of running a 1-HP three-phase 230V motor with 110V single-phase power (seen below). The NEMA-1 (indoor use) enclosed VFD fits nicely on the back of the headstock. Note: There are cheaper drives out there but most of them will require an additional enclosure to operate safely as there are exposed energized connections.
This KB Electronics drive is user friendly as it does not need to be programmed to operate. All of the user settings are controlled by trim pots which makes setup super easy. However if you are the type that likes to set all of your own parameters in a programming format I would suggest using the *KB Electronics model# KBMK-24D which is only about $10 more than this model. Although the “programmable” model will need to be mounted differently, perhaps facing rearward. *The programmable unit may also need an optional I/O board to use a remote forward/stop/reverse switch..
|
|
|
 |
|
|
 |
|
|
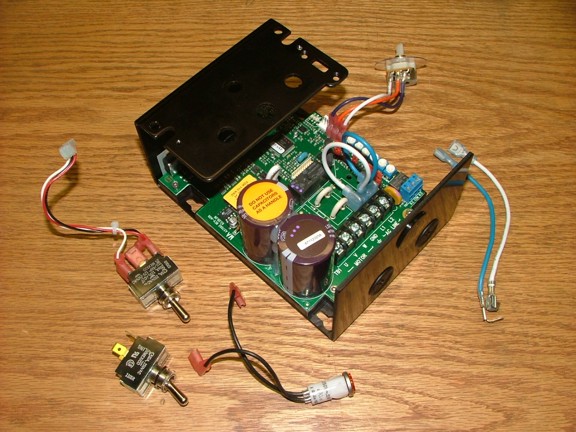
To mount the VFD drive to the lathe I decided to remove the switches, indicator light and speed adjustment potentiometer from the front of the panel. This will allow me to mount the drive facing inward to the headstock and pass the wires through the front of the enclosure. The forward/stop/reverse function will be controlled by the existing lathe switch and the speed potentiometer will be relocated to the front panel on the lathe.
|
|
|
 |
|
|
Using the existing switch connectors I bypassed the power switch connections so the unit turns on when powered up (see the looped wires below). I will reuse the forward/stop/reverse wiring harness connector (below center/left) and extend it to the lathe’s existing control switch on the front panel with some 22 gauge wire. The speed control potentiometer (below upper/right) will be extended with 22 gauge wire also.
|
|
|
 |
|
|
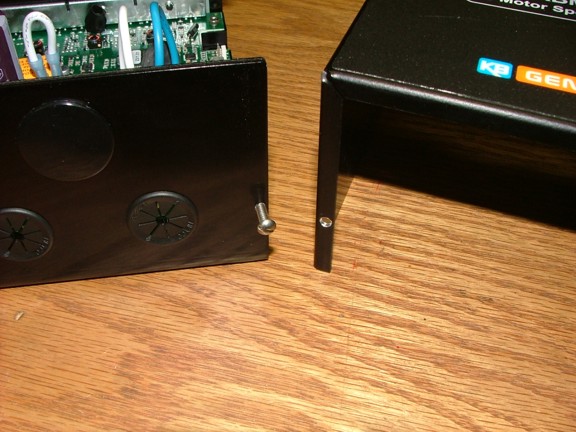
The drive cover is normally held in place with two screws which were on the front of the unit. Since the front side of the drive will be against the lathe control box I decided to add some 6-32 screws to the cover as seen below. These will be accessible once the cover is mounted to the lathe.
|
|
|
 |
|
|
The next step was to mount the control box cover to the drive cover as seen below. I used two 6-32 screws to mount the cover and a 3/4” chase nipple to facilitate the wires coming from the lathe.
|
|
|
 |
|
|
The Henry Arnold VFD conversion article has a nice schematic of how to use the existing start/stop system to “control” the VFD system. This is pretty much the same setup I chose to use and wired it accordingly. Once again it is very appreciated that some go through the trouble to document their build to help save time and money of those trying to accomplish the same goals. This is why I document my builds which is how I help “pay back” the internet community.
Thanks so much for your contribution Henry!!!
|
|
|
 |
|
|
I temporarily mounted the speed control potentiometer in the front of the lathe (not shown) and routed the wires through the headstock for testing. I then mounted the control box cover to the lathe.
|
|
|
 |
|
|
I wired up the drive and proceeded to test its functions. I set the acceleration and deceleration rates along with the maximum and minimum speed trim pots. Within 5 minutes I was ready to go ;0)
Note: This drive can be used to double (2X) the normal speed of the drive motor. I opted to not overdrive the spindle motor for safety reasons being that the spindle is only rated for 2,400 RPM as well as the chuck. If one were to spin up one of these chucks to 4,500 RPM it could self-destruct and punch a hole in your garage!!! I will just use the belt changing system to switch from “low” to “high” range in leu of overdriving a midrange belt setting.
|
|
|
 |
|
|
All that was left to do was mount the drive to the lathe.
|
|
|
 |
|
|
The drive fits beautifully above the motor and does not effect the overall footprint of the lathe.
|
|
|
 |
|
|
You will notice the fuse holder that I added to the control box below. I used a 20A 250V fuse to protect the electronics of the machine.
|
|
|
 |
|
|
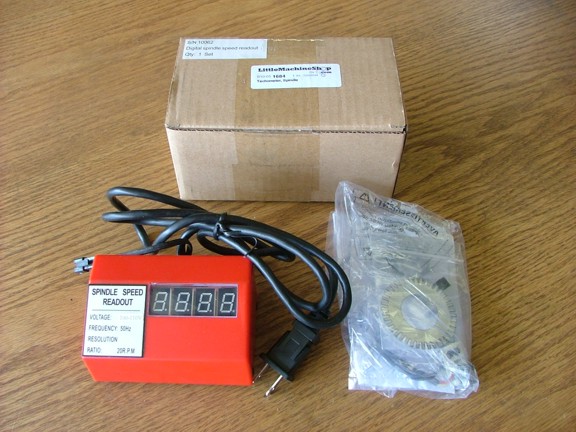
Just as in the Arnold article I wanted a tachometer so I could accurately gauge the speed of the spindle. For this I will be using a Seig made spindle tachometer that is carried by LittleMachineShop.com for about $80 (Cat# 1684). This tach is made for smaller lathes so a larger 40 tooth “encoder wheel” will need to be fabricated to make it work with this lathe.
You may notice that the digits on the tachometer below are naturally white. I’m not sure why the manufacturer left them this way but they are really hard to see when illuminated. I had to add a piece of red filter plastic over the digits so they could be differentiated from the white background (not shown). It’s an easy fix worth mentioning.
|
|
|
 |
|
|
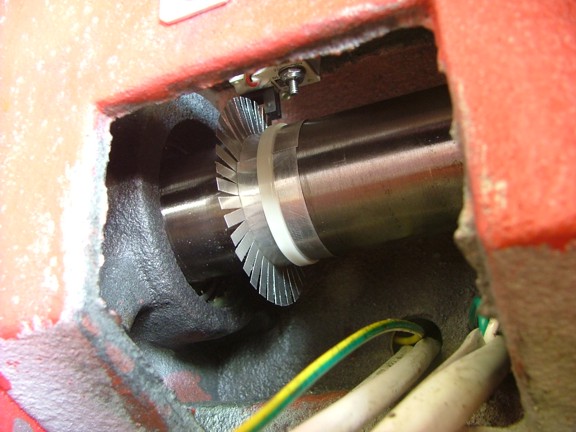
I made a new encoder wheel that clamps to the spindle inside the headstock as seen below. It is made from .015” thick aluminum sheeting that is 5.5” long and 1.25” wide. I cut 39 -.5” long slits into the sheet along one side at .141” centers to make 40 teeth in total. I bent the teeth over and clamped on the aluminum strip with a “zip-tie”. I just had to go through and tweak the teeth so they were straight and evenly spaced so the photo-optic sensor can “see” the gaps in the teeth.
|
|
|
 |
|
|
I mounted the pickup sensor above the wheel as seen below...
|
|
|
 |
|
|
 |
|
|
A rectangular hole was cut into the front panel for the display of the tachometer. The unit was then mounted directly to the backside of the front panel with a set of small machine screws and nuts on either side of the display.
|