 |
 |
|
 |
|
 |
|
 |
|
 |
|
|
 |
|
 |
|
 |
|
|
|
Posted on September 5, 2012:
Hello again folks. I have been working on the governor arm bracket which holds the two governor weights onto the flywheel. I had just finished turning the bracket on the lathe and now I needed to drill out the holes and such on the milling machine. I mounted the bracket into my 5 milling vise and squared it up with the jaws of the vise (which had already been squared with the table).
|
|
|
 |
|
|
The next step is to find the center of the bore using my wiggler tool. Once the spindle was positioned correctly I zeroed out the table.
|
|
|
 |
|
|
I traversed the table over .438 to spot drill the first hole with a #2 center drill...
|
|
|
 |
|
|
I followed the CD with a #33 drill bit as seen below...
|
|
|
 |
|
|
I followed the drill with a 82° countersink bit and drilled until the top of the hole was at .250 in diameter. I then moved the table over to the other side and repeated the process (not shown).
|
|
|
 |
|
|
To perform the next few operations I needed to attach the bracket to a 1-2-3 block. I used some blue Locktite to help fix the part to the block and clamped it down securely. I made sure that the bracket was square with the block as seen below...
|
|
|
 |
|
|
I mounted the block into my milling vise and laid out the weight pin hole locations at .138 in from the outside edges of the pivot tabs (Y axis). The X axis was set at .375 from the block face...
|
|
|
 |
|
|
Once again I used the #2 center drill to spot the first hole.
|
|
|
 |
|
|
I followed the CD with a #31 drill bit...
|
|
|
 |
|
|
An 1/8 chucking reamer was now used to finish off the hole. I repeated the process on the other side at this time as well (not shown).
|
|
|
 |
|
|
The next step is to cut out the slots for the governor weight arms using a 3/32 slitting saw. I centered the saw blade in the pivot tabs by making a test cut in the face of one of the tabs (seen below). I then measured the thickness of the two sides to see how far off I was and adjusted the quill depth to equal out both sides. I zeroed out the depth indicator and I was ready to go...
|
|
|
 |
|
|
I moved the spindle up .023 for the first set of cuts. The slitting saws depth was set to just above the bottom face of the bracket as seen below. Note: The milling tables Y axis was moved across the saw to make these cuts against the cutting direction of the saw.
|
|
|
 |
|
|
I now moved the spindle down .023 from center to cut the bottom side...
|
|
|
 |
|
|
I now mounted the bracket to the flywheel using the flat head screws provided with the basic kit. Not too shabby ;0)
|
|
|
 |
|
|
The last step is to cut the keyway in the bracket using the broach tool. I inserted the broaching bushing into the flywheel and then tapped the 1/8 broach through with a nylon faced hammer. Very little effort was needed to cut the keyway.
|
|
|
 |
|
|
 |
|
|
The next item that I decided to tackle was the shift collar. This part is made from 7/8 cold rolled steel which is included in the materials kit.
|
|
|
 |
|
|
I started out by drilling a 15/32 hole .8 deep into the rod.
|
|
|
 |
|
|
The next step is to use the boring bar to widen the hole out to .500.
|
|
|
 |
|
|
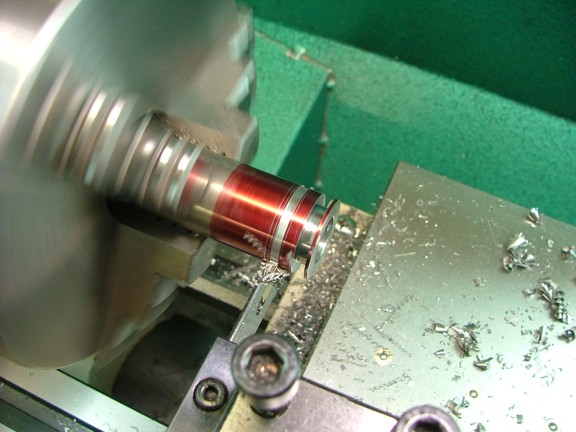
I applied some red layout fluid to the rod and scribed in lines at .040, .170, .295, .425 and .465. These will be the cut lines for the shift collars grooves. Note: Scribing the lines before cutting is a good way to visualize what you are doing however if the cuts must be precise it is best to use the calibrated wheel on the compound rest to position the tool bit...
|
|
|
 |
|
|
I used my .085 wide carbide parting tool to cut out the shift collar grooves to a depth of .188.
|
|
|
 |
|
|
I now used the parting tool to remove the collar from the rod...
|
|
|
 |
|
|
I decided to polish the collar with some 320 grit sandpaper and polishing compound using my 1/2 turning arbor. The grooves were also polished as well to help reduce wear on the bronze latch out bar later on...
|
|
|
 |
|
|
A quick fit test to see if the collar fits the crankshaft and we are good to go!!!
|
|
|
 |
|
|
The next step is to machine the governor weight pins. The pins are made from 3/16 CRS rod that is included in the materials kit.
|
|
|
 |
|
|
The first step is to apply layout fluid to the rod and scribe lines at .063, .525 and .533 for the cut marks.
|
|
|
 |
|
|
I moved the rod over to the mill so I could drill a #56 hole on the .063 mark on the end (prints call for a 3/64 drill bit).
|
|
|
 |
|
|
I moved the rod back to the lathe and started to turn the pin down to a .124 diameter.
|
|
|
 |
|
|
 |
|
|
A quick fit check verifies that the pin will work with the governor arm bracket...
|
|
|
 |
|
|
Lastly I cut the rod on my bandsaw and then trimmed the head to finish the pin.
|
|
|
 |
|
|
I duplicated the process for the other pin (not shown) and I was ready for the next step.
|
|
|
 |
|
|
The next set of parts to machine are the governor weight studs. These are made from the same piece of 3/16 CRS rod as I used for the pins.
|
|
|
 |
|
|
I started out by marking the rod at .638 from the end and then trimming the rod down to .118 in diameter.
|
|
|
 |
|
|
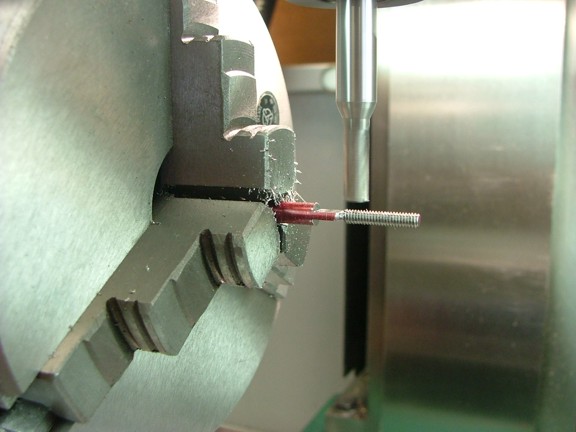
The next step is to thread the rod with 5-40 threads. Normally I would use a die to thread the rod however I have limited practice at cutting small threads with the lathe so I will do this the old school way. I set up the gearbox with the proper gear set for 40 TPI (Threads Per Inch) and installed a carbide thread cutting tool bit for the job.
|
|
|
 |
|
|
I positioned the compound rest at 29° so the tool bit could be properly advanced and lined up the carriage for the first pass...
|
|
|
 |
|
|
I started cutting the threads while taking note of how deep the tool bit was positioned at each pass. I stopped the lathe at the end of each cut while leaving the carriage engaged on the lead screw so the alignment was not lost. I then retracted the tool bit slightly and reversed the lathe to get back to the beginning of the threads for another pass. I then readvanced the tool bit into the threads slightly further in for the next pass.
Note: Most lathes have a threading alignment indicator on the right of the carriage (not shown). This indicator can be used to realign the carriage after disengaging it for multiple threading passes. I personally like to use the reverse method as there is no chance of messing up the alignment.
|
|
|
 |
|
|
A few more careful passes and the 5-40 threads were complete.
|
|
|
 |
|
|
A quick fit check of the threads with a 5-40 nut verified that the threads were correct.
|
|
|
 |
|
|
I now cut a small 45° bevel on the inside edge of the rod to help form the rounded eye of the stud. At this point the opposite side of the rod was cut and threaded the same way before moving on to the next step (not shown).
|
|
|
 |
|
|
I moved the stud(s) over to my rotary table and aligned the spindle over the center of the eye section of the stud. I then set the rotary table at 0° and mounted up a 1/4 end mill.
|
|
|
 |
|
|
I cut a flat spot on the top of the rod to a depth of .063 from the top surface of the rod.
|
|
|
 |
|
|
I then rotated the rod 180° and milled the same flat on the other side.
|
|
|
 |
|
|
I now drilled a #56 hole in the center of the eye...
|
|
|
 |
|
|
 |
|
|
Lastly I cut the studs free from the rod and beveled the ends on my belt sander to finish off the studs (not shown).
|
|
|
 |
|
|
Please join me again for the next episode of the red wing project and thanks for visiting my site!!!
Till then stay creative my friends!!!
Don R. Giandomenico
|
|
|
 |
|
 |
|
 |
|